Tulips crochet pattern Blog
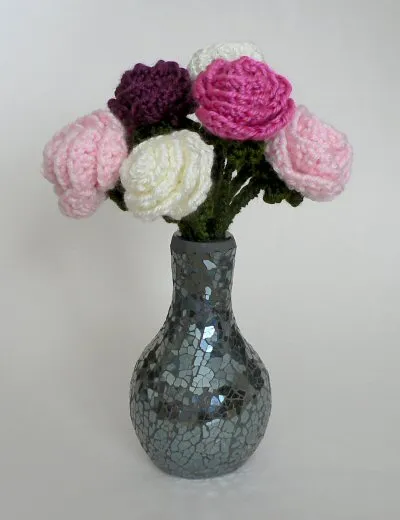
A beautiful realistic tulip flower with a clever one-piece construction – you’ll love how it comes together! Add some colour to your life with a bouquet of everlasting tulips.
Here are some ideas for use:
- Create a beautiful bouquet or vase of tulips
- Add a shorter stem to make a lovely tulip buttonhole
The complete pattern and instructions are available below, regardless of whether or not you choose to pay for them 🙂
Terminology
You will need…
- E US/3.5mm crochet hook
- Small quantity of worsted weight yarn in a floral colour (e.g. white, pink, red, purple, yellow, orange, cream) plus yellow for the flower centre and green for the stem
- Yarn needle
- Stitch marker
- Optional: bamboo skewer, thin dowel, pipe cleaner, or floral wire for the stem
I used worsted weight yarn and a size E hook, which produced a lifelike 2.25″ (6cm) tall flower. (Your gauge and yarn choice will affect the finished size slightly.) Try using a finer yarn or crochet thread with a correspondingly smaller hook to give a more compact flower.
Crochet Instructions
Notes
- Do not join at the end of each round; rounds are worked in continuous spirals.
- Use a stitch marker to mark the beginning of each round. Move the marker up as you start each new round.
- Always change colour in the last loop of the stitchbeforethe colour change:www.planetjune.com/colour
Colour codeA: main colour for petalsB: yellow for centre of flower
Petal Tip (make 3)
worked from top downWithA, make amagic ring, ch 1Rnd 1: 6 sc in magic ring. (6 st)Rnd 2: (sc in next 2 st, 2 sc in next st) twice. (8 st)Rnd 3: (sc in next 3 st, 2 sc in next st) twice. (10 st)Rnd 4: (sc in next 4 st, 2 sc in next st) twice. (12 st)Rnd 5: sc in each st around. (12 st)
Tips 1 and 2 only:Fasten off, leaving a short yarn end.Tip 3 only:Do not fasten off. Continue toPetal Joining.
Petal Joining
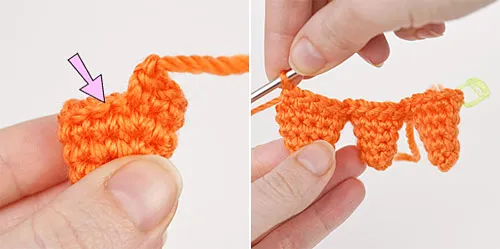
Rnd 6: sc in next 5 st (placing a stitch marker in the first stitch worked); move to the next unworked st of Tip 1 (marked by arrow in photo, below, left) and sc in that st and in next 4 st; move to the next unworked st of Tip 2 and sc in that st and in next 4 st. (15 st).
Note:The three tips are now all joined together in a line (below, right).
Rnd 7: pull the petal tips into a ring with the last round of stitches around the outside, sc in the first stitch of Rnd 6 (the marked stitch) to join the petal tips into a ring; sc in each remaining st around. (15 st)Rnds 8-10: sc in each st around. (15 st)Rnd 11: (invdec, sc in next 3 st) three times. (12 st)Rnd 12: invdec six times. (6 st)WithB:Rnds 13-14: sc in each st around. (6 st)Pull the yarn ends from the colour change through to the inside.Fasten off, stitch the remaining hole closed and weave in the end.(Donotweave in the short yarn ends from Tips 1 and 2.)
Turn Inside Out
Don’t worry that your flower now looks very strange – this is correct! The previous section formed the inside of the tulip, and now you’ll turn it all inside out so you can work the remainder of the outside of the tulip flower.
Grasp the tulip by the yellow centre (below, left), and begin to push it down into the flower (below, centre), to turn the flower inside out.
Note:The yellow centre will not be turned, so you can use it as a handle to push with.
Continue to push it all the way through until the petals are at the top of the flower, and the yellow centre is inside at the bottom (below, right).

Outer Flower
- Insert hook into the specified stitch of the current piece (a), yarn over and draw up a loop.
- Insert hook into the specified stitch on the other piece (b), yarn over and draw up a loop.
- Yarn over and draw through all 3 loops on hook. (The finished sc2tog spans both pieces.)
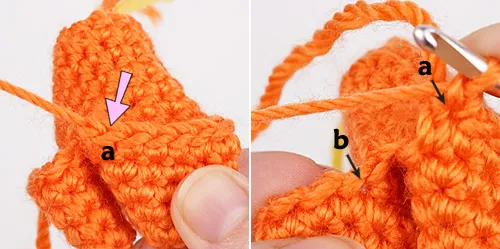
Turn the flower upside down and locate the last stitch you worked on one of the petal tips (the stitch before one of the short yarn ends from the petal tip – we’ll call this pointa, marked by arrow, below, left).
WithA, fasten on into this stitch (by inserting your hook under both loops of the stitch and drawing up a loop), ch 1.
Rnd 1: jsc2tog over thesamest you just worked into (a, below, right) and the first st on the next petal (b, below, right), sc in next 6 st; (jsc2tog over last st of current petal and first st of next petal, sc in next 6 st) twice. (21 st)
Rnds 2-4: sc in each st around. (21 st)Rnd 5: (invdec, sc in next 5 st) three times. (18 st)Tuck any remaining loose yarn ends down inside one of the petal tips to keep them out of the way.Rnd 6: (invdec, sc in next st) six times. (12 st)Rnd 7: invdec six times. (6 st)Join with sl st and fasten off, leaving a long yarn end.
Optional:Make a couple of stitches around the bottom of the flower, passing through both layers, to attach the inner and outer layers together and stop the inside from being pulled out.
Weave in the remaining yarn end.
Stem
I used yarn-covered 1/8″ wooden dowel to make my tulip stems. If you prefer, you may omit the stem altogether, or wrap yarn around, or crochet over, a bamboo skewer, floral wire or pipe cleaners to make a stem (see myBasic Rose patternfor details).
For detailed instructions for making stems, see myEasy Yarn-Wrapped Stems for Crochet Flowersvideo tutorial, or follow the basic instructions below.
To make a yarn-wrapped stem:
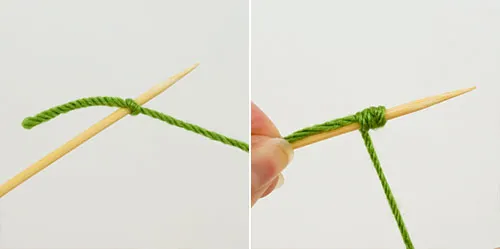
- With the end of the yarn, leave a short yarn tail and tie a single knot tightly around the stem base, about 2cm (3/4″) from the top (below, left).
- Lay the short yarn tail against the stem, pointing down, and begin to wrap the yarn around both the stem and the yarn tail (below, right).
- Continue wrapping the yarn all the way to the bottom of the stem. Once the yarn is well-anchored to the stem, and the tail is covered, you may find it faster to rotate the stem so the yarn is wrapped onto it, pausing to push the turns of yarn together if you notice any gaps between them.
- Knot the yarn around the bottom end of the stem, and secure the knot in place with glue before cutting the yarn.
Finishing and Assembly
Flatten the three petal tips of the tulip, then push the tips together (below, left). Open the tips slightly so they point straight upwards (below, centre) and you can see the yellow centre if you look down from the top of the flower (below, right).

Insert the uncovered tip of the stem through the hole in the bottom of the tulip, so it goes up inside the middle of the yellow centre of the flower.
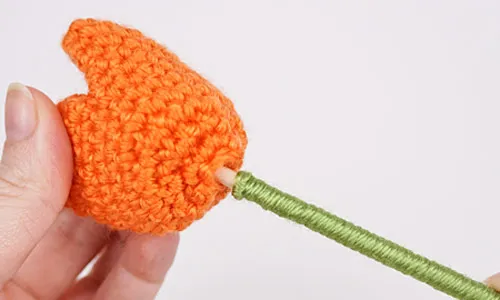
Optional:To keep the flower head from being pulled off, you can pull the stem out most of the way again, apply some white glue to the top of the stem, push it back into the flower, and hold it in place for a minute until the glue dries.