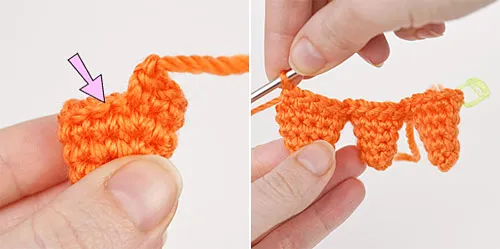
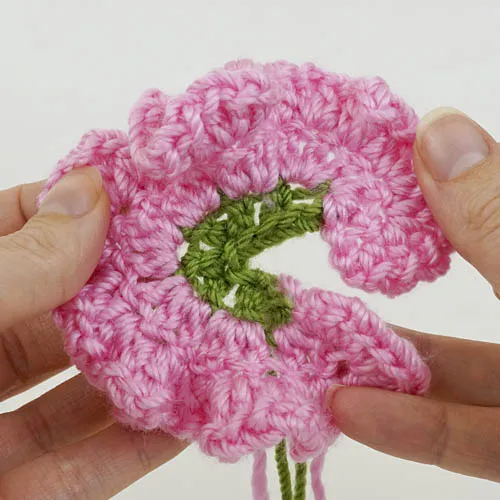
Calla Lily / Peace Lily crochet pattern Blog
Crochet realistic Calla, Peace, or Arum Lily flowers – elegant, sculptural blooms that look stunning in a tall vase and are perfect for modern floral arrangements, wedding bouquets, or Easter décor.
Mix and match with my other cut flower crochet patterns to create your own custom display in your favourite colours! Make your lilies in classic white, or get creative: try yellow, orange, pink or dark purple.
The complete pattern and instructions are available below, regardless of whether or not you choose to pay for them 🙂
A Botanical Note…
Technically, this lily is not a flower! The ‘petal’ is actually aspathe, a modified leaf that surrounds thespadix, a central spike covered in tiny flowers.
To keep things simple, for this pattern we’ll call this beautiful bloom a lilyflower(your choice of calla or peace!) with a singlepetaland a yellowcentre.
Terminology
You will need…
- E US/3.5mm crochet hook
- Small quantity of worsted weight yarn in white or another floral colour (e.g. cream, yellow, orange, pink, purple) plus yellow for the flower centre and green for the stem
- Yarn needle
- Stitch marker
- Floral wire (or other stiff wire), or bamboo skewer or thin dowel for the stem
I used worsted weight yarn and a size E hook, which produced a large 5″x2″ (13x5cm) flower. (Your gauge and yarn choice will affect the finished size slightly.) Try using a finer yarn or crochet thread with a correspondingly smaller hook to give a more compact flower.
Crochet Instructions
Notes
- Do not join at the end of each round; rounds are worked in continuous spirals.
- Use a stitch marker to mark the beginning of each round. Move the marker up as you start each new round.
Colour codeA: white or your choice of colour for petal (spathe)B: yellow for centre of flower (spadix)C: green for stem
Petal
WithA, make amagic ring, ch 1.Rnd 1: 4 sc in magic ring. (4 st)Rnd 2: sc in each st around. (4 st)Rnd 3: (2 sc in next st, sc in next st) twice. (6 st)Rnd 4: (2 sc in next st, sc in next st) three times. (9 st)Rnd 5: (2 sc in next st, sc in next 2 st) three times. (12 st)Rnd 6: (sc in next 4 st, 2 sc in next 2 st) twice. (16 st)Rnd 7: (sc in next 5 st, 2 sc in next 2 st, sc in next st) twice. (20 st)Rnd 8: (sc in next 6 st, 2 sc in next 2 st, sc in next 2 st) twice. (24 st)Rnd 9: (sc in next 7 st, 2 sc in next 2 st, sc in next 3 st) twice. (28 st)Rnd 10: (sc in next 8 st, 2 sc in next 2 st, sc in next 4 st) twice. (32 st)Rnds 11-16: sc in each st around. (32 st)Rnd 17: (sc in next 10 st, invdec, sc in next 4 st) twice. (30 st)Rnd 18: (sc in next 4 st, invdec, sc in next 4 st) three times. (27 st)Rnd 19: (invdec, sc in next 7 st) three times. (24 st)Rnd 20: (sc in next 3 st, invdec, sc in next 3 st) three times. (21 st)Rnd 21: (invdec, sc in next 5 st) three times. (18 st)Rnd 22: sc in next 13 st, invdec twice, sc in next st. (16 st)Rnd 23: sc in next 12 st, invdec twice. (14 st)Join with sl st to next st and fasten off, leaving a long yarn end for assembly.
Centre
Tip:The centre of the lily is a very narrow tube, with only 4 stitches per round.See my videofor tips on working these very narrow tubes. If you still have difficulties, you can make a slightly chunkier centre with 5 stitches per round instead of 4. To do this, just make 5 sc into the magic ring instead of 4, and continue from there with 5 stitches per round.
WithB, make amagic ring, ch 1.Rnd 1: 4 sc in magic ring. (4 st)Rnds 2-8: sc in each st around. (4 st)Join with sl st to next st and fasten off, leaving a long yarn end for assembly.
Assembly
I used floral wire wrapped with floral tape as the base for my stems. (The floral tape is optional but helps to thicken the stem base before you wrap it with yarn). If you prefer, you may omit the stem altogether, or wrap yarn around, or crochet over, a thin wooden dowel or bamboo skewer to make a stem.
Note:The flower is quite heavy, so you’ll need to use a stiff wire or dowel,nota pipe cleaner, for your stem base.
Insert one end of the wire or dowel you’ll be using as the stem into the yellow centre of the flower, so you can see where to begin wrapping the yarn. Starting from just below the height of the covered part (below left), begin to wrap the remainder of the stem with green yarn.
Tip:You may find it easier to wrap the stem if you first remove the crocheted piece (below, right).
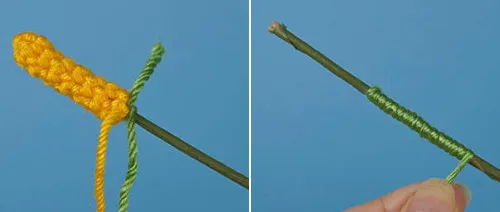
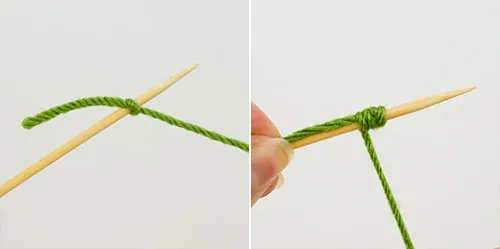
For detailed instructions for making stems, see myEasy Yarn-Wrapped Stems for Crochet Flowersvideo tutorial, or follow the basic instructions below.
To make a yarn-wrapped stem:
- With the end of the yarn, leave a short yarn tail and tie a single knot tightly around the stem base, about 2cm (3/4″) from the top (below, left).
- Lay the short yarn tail against the stem, pointing down, and begin to wrap the yarn around both the stem and the yarn tail (below, right).
- Continue wrapping the yarn all the way to the bottom of the stem. Once the yarn is well-anchored to the stem, and the tail is covered, you may find it faster to rotate the stem so the yarn is wrapped onto it, pausing to push the turns of yarn together if you notice any gaps between them.
- Knot the yarn around the bottom end of the stem, and secure the knot in place with glue before cutting the yarn.
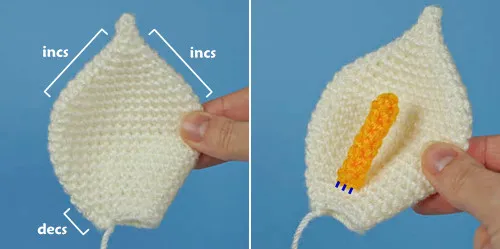
Flatten the petal so the increases near the top are at the sides, and the decreases in the final rounds are at one side of the flattened piece (below, left). The flattened piece will naturally form a slight bowl shape.
Place the centre on top of the petal, so the open end of the centre istwo rounds higherthan the open end of the petal.
Using a yarn needle and the long yarn end from the centre, make a couple of stitches to secure thelower edgeof the centre to the petal where the two pieces touch (below, right), making sure to only stitch through theupper layerof the petal so your stitches won’t show from the outside. Fasten off securely and lose the remaining yellow yarn end inside the centre.
If you removed the stem from the centre, re-insert it now. Fold the side with the decreases (arrow, below, left) tightly over the stem, and make a few stitches to hold the lowest 3 rounds of the edge to the inner layer only of the other side of the petal (dotted line, below, right).
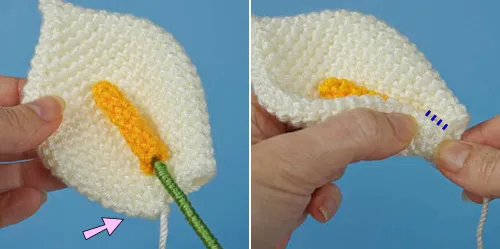
Do not fasten off.
Now wrap the second side over the first. At this stage, you have a choice:
- For a wide open flower, overlap and stitch down only the lowest few rounds (below, left).
- For a bud-like flower, overlap about a third of the height of the petal, to create a narrower shape (below, right).
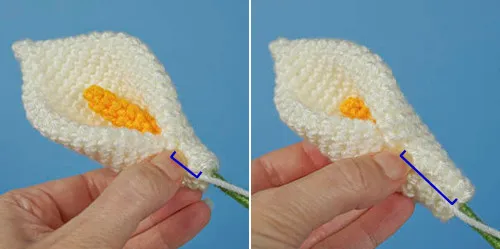
When you’re happy with the amount of overlap, stitch the edge of the second side down to hold it in position. Fasten off securely and lose the remaining yarn end between the layers of the flower.
Turn the flower to look at the bottom – there should be about 6-8 stitches around the open edge of the petal that surrounds the stem. (The exact number of stitches isn’t important – it depends on how tightly you wrapped the sides.)
Fasten on by drawing up a loop ofCin any of the stitches around the circle (below, left).
Rnd 1: sc in each stitch around, jumping across the gap between the sides when you reach it, to complete the ring (below, right). (6-8 st)
Note:In the next round, you’ll use invdec stitches to decrease the number of stitches to 4 or 5, or as few as you can comfortably work with. (Again, the exact number of stitches isn’t important – it depends on the thickness of your stem, and how easily you can insert your hook without the stem getting in the way!)
Rnd 2: sc in the first stitch, then invdec and/or sc around to complete the round (4 or 5 st)Rnds 3-4: sc around. (4 or 5 st)
Note:To create a longer neck, add more rounds of sc now, before you fasten off.
Join with sl st to the next stitch and fasten off, leaving a long yarn end.
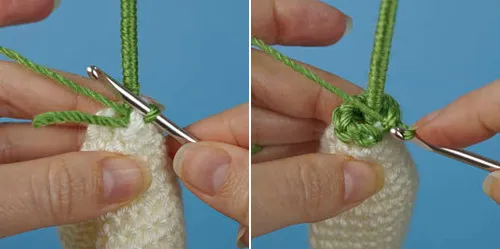
Run your fingers down the neck, away from the flower, so the green stitches elongate and nestle closely to the stem and the neck doesn’t look too bulky.
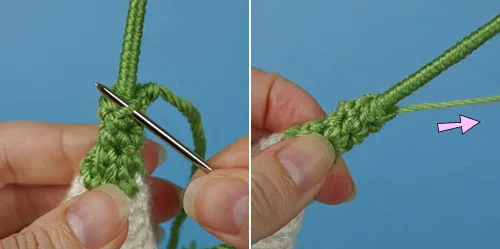
Using a yarn needle, weave the yarn end through the outer loop of each of the remaining stitches (below, left), then pull tight to draw the edge smoothly down around the stem and lock it into position (below, right). Secure the yarn, then lose the end within the neck.
Note:This is basically the same method as theUltimate Finishfor closing a remaining hole – except that you have a stem protruding from the middle of the hole!
Re-crease the sides of the flower so the edges regain their flattened shape (below, left). Shape the flower by curving the tip back as much as you want (below, right), and, for a more open flower, you can also curve the upper edges back slightly too.
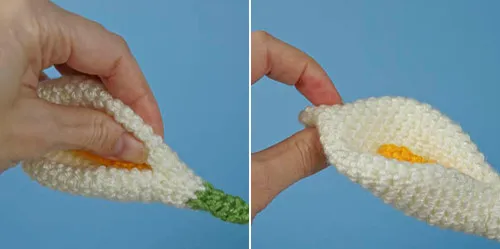
If you don’t treat it roughly, your flower will hold this shape with no assistance! (And you can also reshape it again later, if needed.)