Posy Blossoms crochet pattern Blog
Posy Blossoms is a versatile mix-and-match pattern to make sweet miniature flowers in seven designs with two leaves. Make each blossom in one or two colours of your choice; stack the smaller blossoms on the larger ones in the same or contrasting colours; combine your blossoms into a unique posy.
A few ideas for using these blossoms…
- Use a single flower to embellish a hairclip
- Stitch two or three to a bag or purse
- Combine into a larger posy for a brooch or pin
- Stitch around the neckline of a t-shirt or cardigan
- Embellish a photo frame
- Decorate your amigurumi
- Create floral crocheted jewellery
You may also like myCrocheted Embellishments tutorialwhich walks you through how to create clustered embellishments and attach them securely to hardware (hair clips, barrettes, hairbands, pin backs etc), like these:
Now back to the Posy Blossoms pattern! Here are the 9 components included in this pattern:
A:Small Blossom;B & C:Medium Blossoms;D & E:Large Blossoms;F & G:Spiked Blossoms;H:Single Leaf;IDouble Leaf
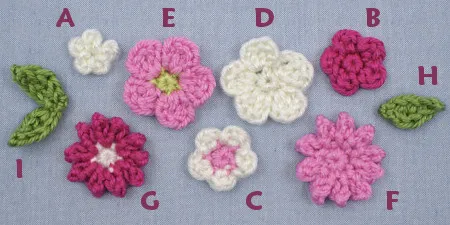
The complete pattern and instructions are available below, regardless of whether or not you choose to pay for them 🙂
Terminology
You will need…
- E US/3.5mm crochet hook
- Small quantity of worsted weight yarn in the colours of your choice
- Yarn needle to weave in ends
Size
Approx 0.75″ – 1.5″ (2 – 4cm) wide. (Your gauge and yarn choice will affect the finished size slightly.)
Gauge
Gauge is unimportant for this pattern. I like to crochet with a small hook so they aren’t too floppy and there are no gaps between the stitches; if you prefer a looser, floppier look, use a G or H hook instead.
Notes for all blossoms
- Do not turn work between rounds.
- As you crochet each blossom, if you plan to stack another blossom on top or add a knotted centre, don’t pull the magic ringtootightly closed. This will make it easier to thread yarn through the centre of the ring when you stitch the pieces together.
Blossoms
A: Small Blossom
To make this flower, you must be comfortable with the magic ring technique. Instead of single crocheting into the magic ring, the entire flower is crocheted directly into the ring, and then the ring is pulled tight to complete the blossom.
Small Blossoms, L-R:A(plain);A, with knotted centre added (seeStacked Flowers, below, for instructions)
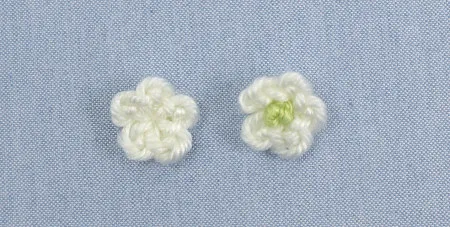
Make amagic ring, ch 2.Rnd 1: sl st into magic ring, (ch 2, sl st into magic ring) four times.
Cut yarn, leaving a long yarn end. Pull on the remaining loop on the hook until the cut end is drawn through to the top. Pass the end down through the centre of the magic ring, to the back. Pull the magic ring tightly closed:The small blossom before (left) and after (right) pulling the magic ring closed.
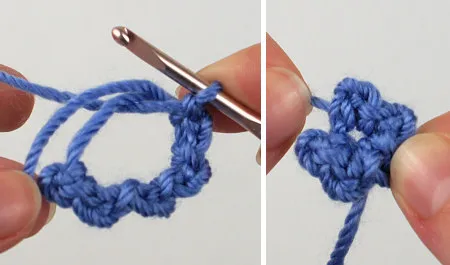
Continue toYarn Ends(below).
B & C: Medium Blossom
Medium Blossoms, L-R:B(solid);C(bi-coloured)
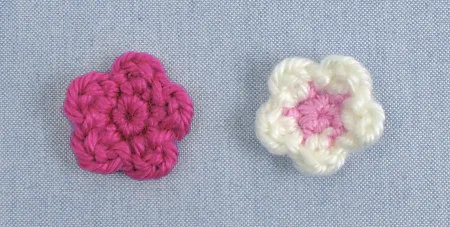
Make amagic ring, ch 1.Rnd 1: 5 sc in magic ring.OptionConly: change to petal colour.Rnd 2: (sl st in next st, ch 1, hdc insamest, ch 1) five times.Join with sl st into first stitch of the round.
Cut yarn, leaving a long yarn end. Pull on the remaining loop on the hook until the cut end is drawn through to the top. Thread the end onto a yarn needle and pass it through the same stitch as the last sl st, to the back.
Continue toYarn Ends(below).
D & E: Large Blossom
Large Blossoms, L-R:D(solid);E(bi-coloured)
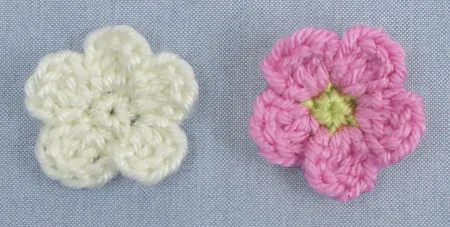
Make amagic ring, ch 1.Rnd 1: 5 sc in magic ring.OptionEonly: change to petal colour.Rnd 2: (sl st in next st, ch 2, 2 dc insamest, ch 2) five times.Join with sl st into first stitch of the round.
Cut yarn, leaving a long yarn end. Pull on the remaining loop on the hook until the cut end is drawn through to the top. Thread the end onto a yarn needle and pass it through the same stitch as the last sl st, to the back.
Continue toYarn Ends(below).
F & G: Spiked Blossom
The Spiked Blossom is the same size as the Large Blossom, but has 10 pointed petals instead of 5 rounded ones.
Spiked Blossoms, L-R: F (solid); G (bi-coloured)
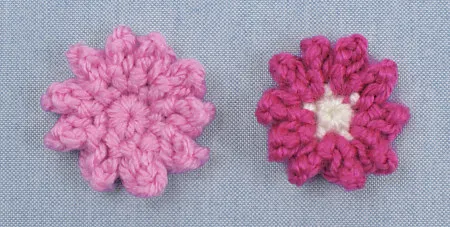
Picot:ch 3, sl st in back bump* of 3rd chain from hook.* For an explanation of the back bumps of a chain, see ‘What are the back bumps?‘ (below).
Make amagic ring, ch 1.Rnd 1: 5 sc in magic ring.OptionGonly: change to petal colour.Rnd 2: (sl st in next st, picot, sl st insamest, picot) five times.Join with sl st into first stitch of the round.
Cut yarn, leaving a long yarn end. Pull on the remaining loop on the hook until the cut end is drawn through to the top. Thread the end onto a yarn needle and pass it through the same stitch as the last sl st, to the back.
Continue toYarn Ends(below).
Stacked Flowers
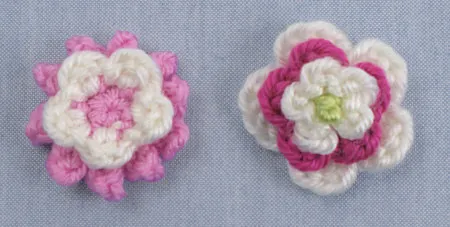
Stacked Flower examples, L-R: blossomsF+C; blossomsD+B+A+ knotted centre
To make stacked flowers, layer smaller blossoms on top of larger ones, in the same or contrasting colours.
To keep them in position, you have two options:
- Stitch together:Use the yarn ends from the top blossom to stitch down through the stack. Tie the yarn ends together on the back.
- Knotted centre:Make a contrasting coloured centre for the flower by cutting a 6″ length of yarn and tying a large knot in the centre of the length. Thread both ends onto a yarn needle and pass the needle through the centre of the stack to the back. Tie the ends together on the back.Note:You can also give any of the flat blossoms a contrasting-coloured centre with this method!
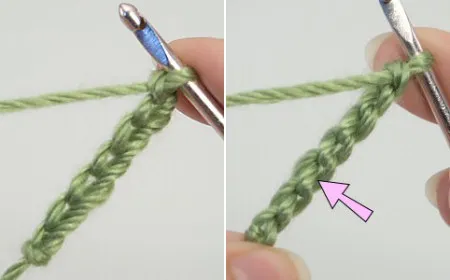
What are the back bumps?
L: The front of a chain, showing the V shape of each chain stitch.R: Flip the chain over and you’ll see a bump at the back of each chain stitch (marked by arrow).
Leaves
All leaf stitches should be worked into theback bumpsof the starting chains.
Leaves, L-R:H(single);I(double)
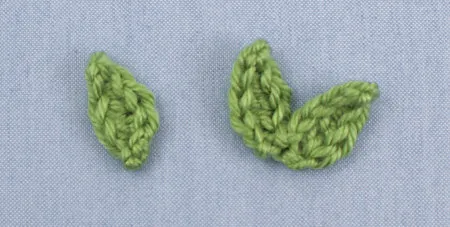
H: Single LeafWith green yarn, ch 6, sc in 3rd chain from hook, dc in next 2 chains, sl st in last chain.Cut yarn, leaving a long yarn end.Draw end through last loop and pull tight to fasten off.
I: Double LeafWith green yarn, (ch 6, sc in 3rd chain from hook, dc in next 2 chains, sl st in last chain) twice.Cut yarn, leaving a long yarn end.Draw end through last loop and pull tight to fasten off.
Both Leaves:continue toYarn Ends(below).
Yarn Ends (all Blossoms and Leaves)
Tie the two yarn ends together (tie each pair together for the 2-coloured flowers). You have two options for finishing, depending on what you’d like to do with your blossoms and leaves:
- Use the yarn ends to stitch the blossoms/leaves into position.
- Snip the yarn ends short. Making sure the remaining ends are hidden underneath each blossom/leaf, glue the blossoms/leaves into position or stitch them down with a needle and sewing thread.